
About the hc-sr04 sensor
Among the lands of arduino and diy projects, the HC-SR04 is one of the easiest components to recognize. Being used in many projects such as robots and alarms, it is used to detect obstacles and even to measure distances between objects. This component is composed by an ultra sound emiter and a receiver that work emitting and receiving sound at a frequency of 40KHz, a frequency that is not audible by humans.
Its workflow is very simple though, in a general use-case scenario, the sensor first emmits a 40kHz sound pulse, then starts “listening” for a reply. If the sound pulse hits an object it will rebound and be capturated by the receiver, thus a calculation will be made and the distance will be known. The distance will be calculated according with the response time.
The sensor has 4 pins:
- Vcc 5V
- Trigger (pulse send command)
- Echo (pulse receive)
- GND
This sensor works at 5V dc has a working frec of 40KHz, consumes about 2mA suspended and 15mA working, has an effective angle of <15 and can measure from 2cm to about 400cm with a 0.3 cm of resolution.
Prototype
Now that we know this sensor a bit more, we can try to play with it. Let’s think about a car, in modern cars you often find “parking sensors” that emit a sound or blink a light when the car is close to an object, we can work on the similar idea. To make it easy, we can re-use some learnt concepts and build a system that will check if an object is in a 20cm ratio and turn a led on when in. You should already know how to work with a led in arduino. Regarding to the ultrasound component, we know that it works at 5V so appearently we won’t need to add extra resistors. TRIG and ECHO pins are digital and will receive/send a value (some processing is made on the component chip).
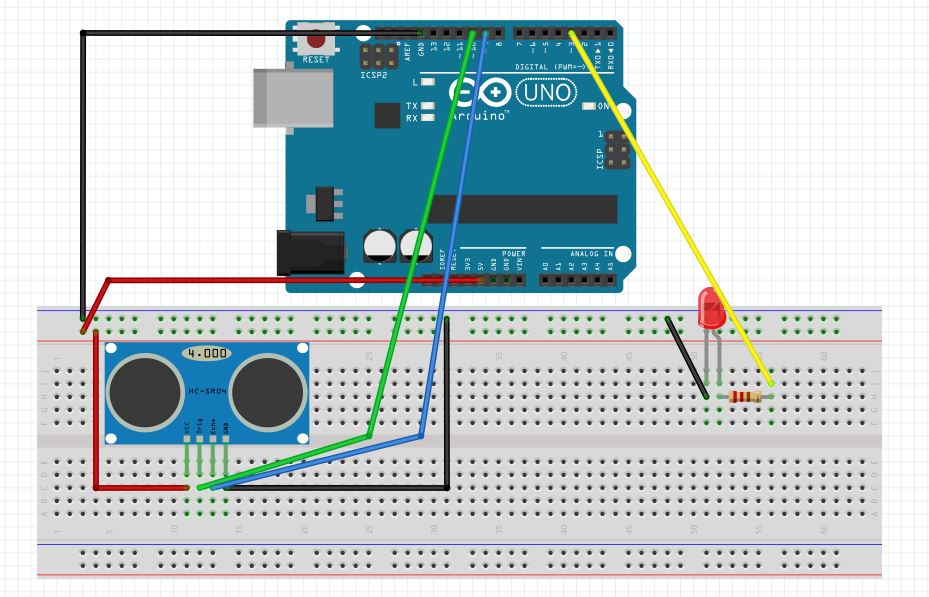
A typical design with frietzing will look like this one:
Code
This example will make the sensor send a pulse, wait for a response, calculate the distance and turn on the led.
int TRIG = 10;
int ECO = 9;
int LED = 3;
int DTIME;;
int DIST;
//wrote for arduino uno
//blinks a led if an object approaches 20cm or less to the HC SR04 SENSOR (ultrasound)

void setup() {
  pinMode(TRIG, OUTPUT);
  pinMode(ECO, INPUT);
  pinMode(LED, OUTPUT);
  Serial.begin(9600);

}

void loop() {
  digitalWrite(TRIG, HIGH);
  delay(1);
  digitalWrite(TRIG, LOW);
  DTIME = pulseIn(ECO, HIGH);
  //we convert dist to cm
  DIST = DTIME / 58.2; //value specified from the manufacturer but can be calculated as well
  Serial.println(DIST);
  delay(200);

  if(DIST <= 20 && DIST >= 0){
    digitalWrite(LED, HIGH);
  }
  else{
    digitalWrite(LED, LOW);
  }
}
If we compile and upload this program and open the serial bus monitor on the arduino (top right in the window, lens icon) we will start receiving distance values, we can test that by putting objects far and close from the sensor.
Then, the first thing that you would ask here probably is, where 58.2 came from? Well think about that. The speed of sound is 343.2 m/s, in our case the pulse has to make a “round trip” (echo) so 343.2/2=172.6 or 17160 cm/s = 0.01716 cm/us = 1cm/58.3us which is 1cm/58.3us then you can just multiply this number n(us)*cm/58.3us= n(cm)/58.3. Note that u = micro, and 1 microsend equals 1e6 seconds. So we are basically playing with the fact that Speed = Space / Time thus Space = Speed * Time.
The rest of the code is quite intuitive. We already know how to setup pins for input or output, this time we see a “Serial.begin”, we use that to initialize the serial of arduino and we set a speed of 9600 bauds (bits per second), this will be de speed for serial data transmission between arduino the pc by using the serial bus. We will explore this concept in depth further on the course, but just note that Serial is used to retrieve information from arduino in our pc. Then if we look at the loop() we see a digitalWrite of HIGH to the TRIG pin, this is mandatory for this component and is used for “initializing it”, thats it. After doing this initialization, the component will send a pulse and with pulseIn(ECO, HIGH) the receiver will wait for the ECHO and note the time. After that the distance will be calculated with the formulae we just presented and will be sent to the arduino IDE by Serial.println (print line).
